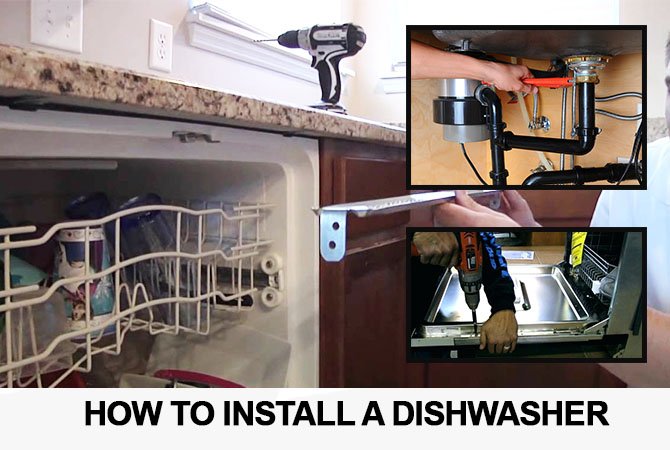
Step 1. Installation of the dishwasher
Before getting started, remove all sealing parts used for transporting. After removing these items, place the dishwasher where you want it to stand. Remember that the distance from the dishwasher to the draining point should not exceed one and a half meters – this is important for reliable operation of the pump which will pump water through the drain hose. If the length of the drain hose will be more than 1.5 m, it may lead to premature failure of the pump and the entire dishwasher.
When placing the machine on the floor, make sure it stands firmly at every point of contact with the horizontal surface. If you install a built-in dishwasher, then pay attention to the contact of furniture with the walls of the appliance. It should be tight.
Step 2. Plumbing
Dishwasher requires separate water drain line. Sometimes it may have filters for additional water cleaning which block large particles of rust, sand and other dirt from the plumbing system.
After installing the filter, take care of the tap to shut off the water otherwise you risk to flood the apartment if the intake valve of the dishwasher opens. Buy a dishwasher equipped with a leak prevention system. Different manufacturers call this system differently: Aqua Stop, Waterproof, Aqua-Control or Aqua Alarm. If you can’t use a standard 1.5 m drain hose, then it may be extended.
Step 3. Draining water from the dishwasher
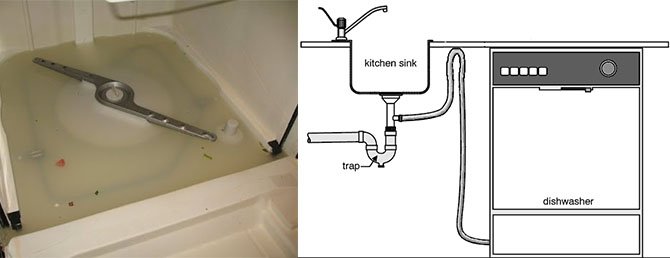
Draining water into the sewer is equally important. It can be done through a direct connection of the appliance with a hose either to the sink or directly to the sewage system. In the latter case, we use a special device in the form of a siphon and another drainage system, which makes it impossible for the wastewater to get back from the drain into the dishwasher.
For additional insurance, the drainage system of the dishwasher is organized the way that the point of entry into the sewer is always lower than the drain hose itself. To do this, we need to fix the hose at a height of half a meter from the place of its connection to the wastewater. Then we bend it and connect the drain hose to the siphon. If this does not work with a short 1.5m hose, you need to extend it. It is not recommended to use a hose which is more than 3 meters in length, and the extreme limit is 5m.
Step 4. Connection to the power supply
Dishwashers are connected to the power supply with a three-core copper wire 2 Sq mm. This wire is required in order to withstand maximum loads on the power grid. In order to prevent the dishwasher from breaking, it must be protected by a circuit breaker automatic switch (16А), which will automatically turn it off when a power output reaches 3.6 kW. This will save your nerves and money in case of a serious breakdown. Such automatic switch has to be installed in parallel with the already installed switches used on other appliances.
Step 5. First run of the dishwasher
After everything is checked, installed and connected, you need to run the dishwasher in idle mode in order to check the connection, as well as the operation of the appliance. We do not load the dishes but add detergent and salt to the dispenser.
Salt is added to control the hardness of the water while detergent cleans the working surfaces from contamination that remains in the tub after assembly. The idle cycle helps to monitor the dishwasher operation. For example, the operation of electronics, the intake of water, its heating efficiency, drain of water into the sewer system, filtering and other systems.