AirPods owners often complain about a certain problem with their devices, and some of them have experienced it for several years. It lies in the fact that the device continues to turn off. You can solve this problem, but you have to try. To get started, you should read the materials in this article.
AirPods keep turning off
If the system is still behaving strangely, the first step is to turn off Bluetooth on the phone, and then turn it back on. If there is no result, you need to go to the settings section, and then select “Bluetooth”, “Information” and, finally, forget this device. After opening the case cover, you need to hold the button on the back panel for 10 seconds to perform a second pairing.
As a result, the system will be completely rebooted, after which the connection should be successful. If it doesn’t work, don’t panic. The fact is that there are other proven methods that can be used to solve the problem. By following the instructions below, you can achieve efficient, high-quality system operation.
Often it is not at all clear what exactly causes such a difficulty, and the company itself has not recognized the existence of this problem. However, fixing it is real.
Reset Bluetooth
When the device continues to turn off, the first thing to try in this case is to perform a factory reset. To do this, you must follow the following algorithm of actions:
- go to the section with settings;
- select the item with bluetooth;
- deactivate it;
- wait for 20 seconds;
- then turn it on again;
- reassemble the device;
- try to reconnect.
Along with this, it will not be difficult to swipe down on the main screen, and then click on the blue icon so that it turns gray, that is, turned off. Then you need to wait 20 seconds and turn it on so that the blue color appears again.
If suddenly this recommendation does not work the first time, you can solve the problem by repeating the steps before proceeding with further steps.
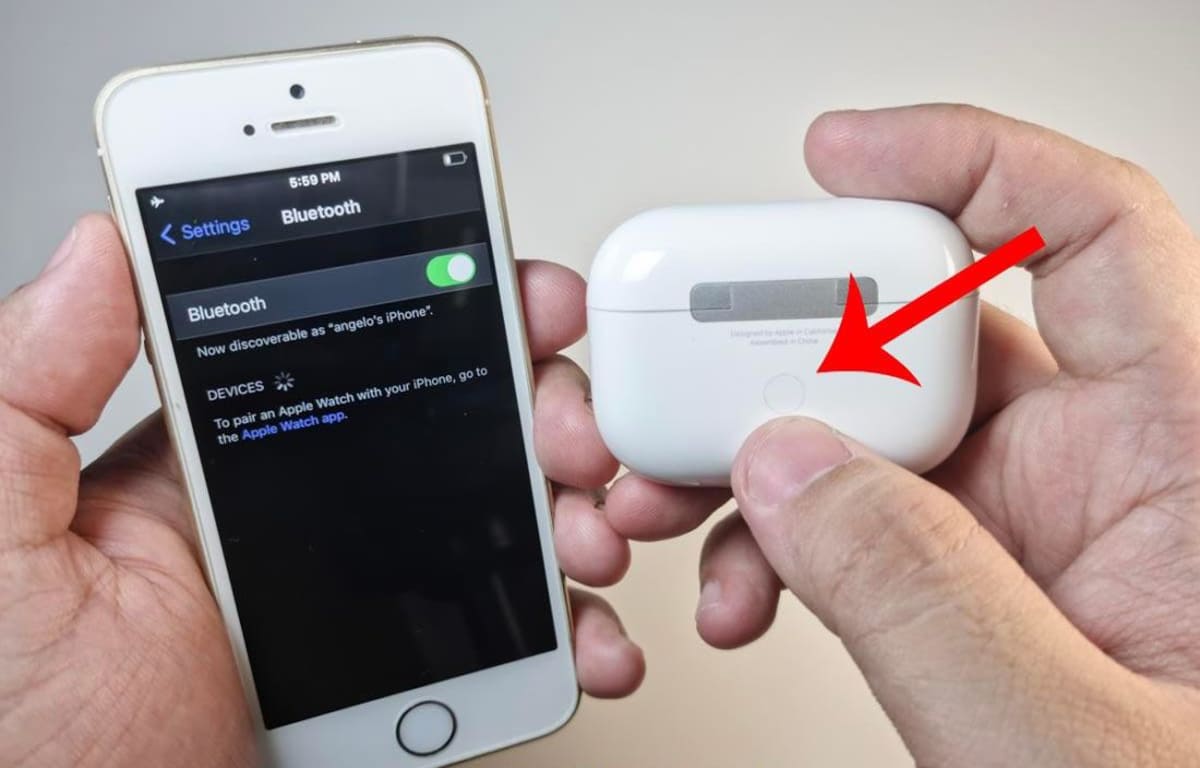
Reset AirPods
This fix is considered extremely simple, but it is more difficult compared to factory reset. The great news is that this will work in 90% of situations on average. The first step is to “forget” this device. To do this, you need to follow the instructions:
- go to the settings section;
- select the item Bluetooth;
- click on the data icon directly next to the AirPods;
- select the “forget device” sign.
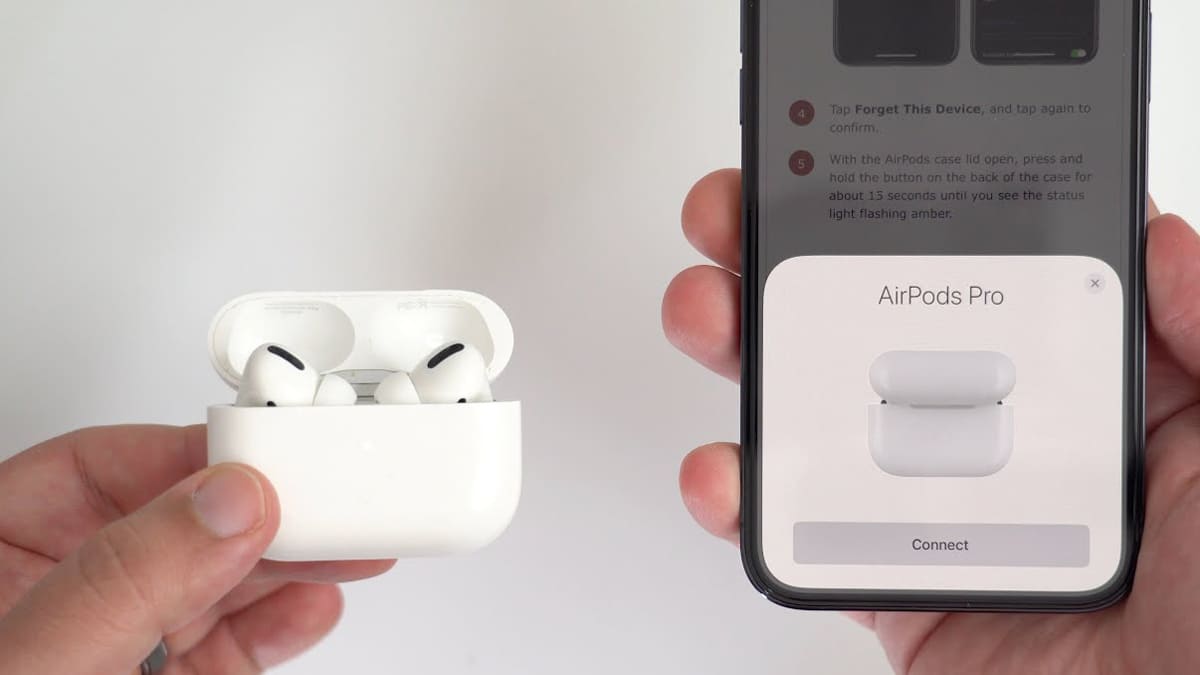
After deleting the data, you will need to synchronize them, for this you need to take the following steps:
- make sure that Bluetooth on the phone is not working;
- put the wireless headphones into the case to charge, while the lid should be open;
- click on the button located on the back of the case and hold it until the indicator emits a white flash;
- as a result, the headphones should be displayed on the phone, you need to select the connection function, which will take only a few seconds.
After a full reboot, the phone should work as stably as possible.
Reset iPhone
There are two options. The first method involves completely turning off the phone. This step should help solve a lot of problems. To turn off the device, simply press and hold the side button.
The second method is related to resetting the iPhone settings, and we are talking about all network settings. With this step, it will be possible to delete previous connections, as well as disconnect from active networks. To do this, follow these instructions:
- go to the settings section;
- scroll down until the “general” section appears;
- select “reset” at the bottom;
- stop at the button to reset all network settings.

Software update
It is being improved and corrected on an ongoing basis. If you use outdated programs, it is possible that they are causing the device to constantly turn off. Therefore, it is important to update your phone whenever possible. It is even recommended to enable automatic updates so that this happens at night, while the user is sleeping. The procedure is as follows.
- First you need to go to the settings section.
- Then you need to scroll down.
- At the top, select software update.
- Then stop on updates in automatic mode.
- Toggle downloading updates and installing them.
- Go back and see if any updates are available.
- Select the item “install now” with a positive answer to the question of the previous paragraph.
The user can avoid numerous problems by taking such measures.
Turn off nearby devices
If there are other portable devices and headphones nearby, as well as keyboards and mice, they are likely to be interfering. The user can be sure that they will not be difficult to avoid if simply “forget this device”. At the very least, this step will help rule out some common problems.

Cleaning your headphones and charging ports
If the user hears a sound, this may be due to dirt, soot, and earwax that has accumulated in the device and got inside the charging port. First you need to get an ordinary cotton swab and gently wipe the bottom metal ring. Then it remains to open the case and clean the charging port. It is important to make sure that the bottom has been reached. If necessary, you can saturate the cotton wool with a small amount of isopropyl alcohol to make the cleaning as deep as possible.
During these steps, you need to check the speaker. This garbage can accumulate over time, as a result, the sound in the headphones can become as quiet as possible. If you are a happy owner of an AirPods Pro system, you may even need to remove the tip to check the speaker for dirt or debris.
It is useful to get a flashlight at all or activate the flash on your phone for a qualitative examination of the situation. If you make sure that the connection areas are clean enough, as is the sensor with the speakers, the problem may be solved once and for all.
Disable automatic ear detection
By default, the system we are considering has a technology that detects when it is in the ear. After confirming this fact, sound will start. Of course, this is a cool approach, but if there are problems, the connection will be defective, as a result, the sound in the headphones will begin to be interrupted.
The main reason why this function is observed to work is that the headphones are dirty. Therefore, one must make sure that they have been well cleaned, as already noted, one must follow certain instructions, and they are presented above.
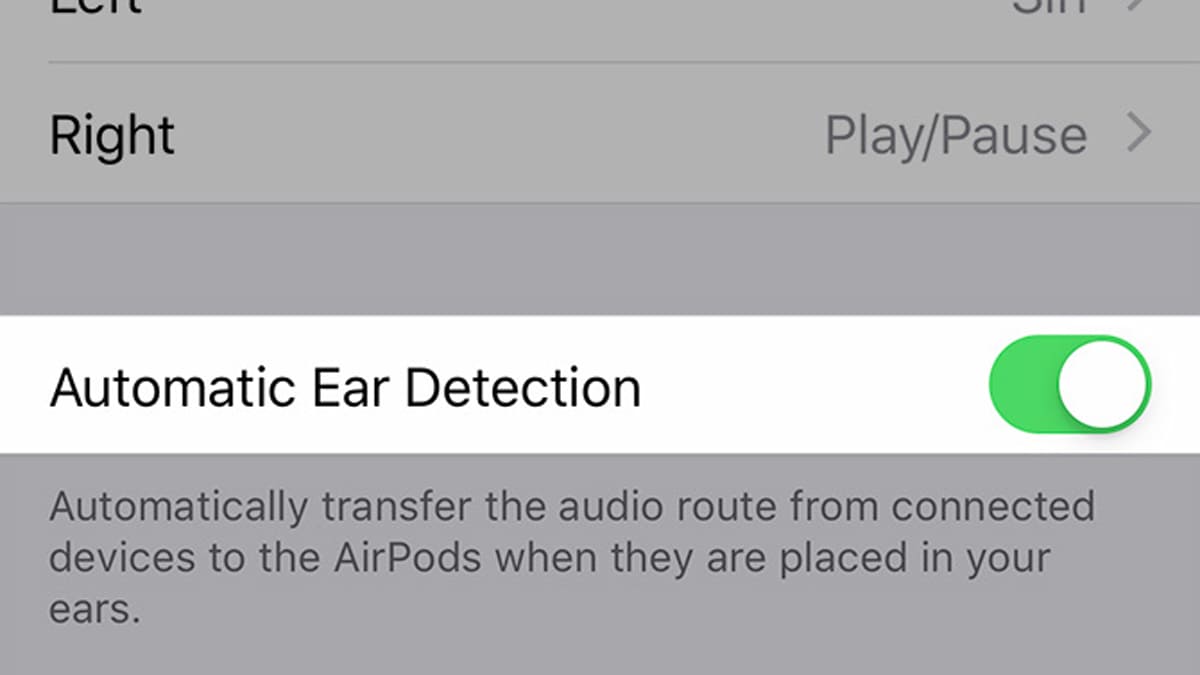
At first, you can simply turn off automatic ear detection to see if this is the true cause of the problem. It is also worth noting that immediately after disabling this option, the headphones will continue to play, even if they are not in the ears. You can deactivate automatic ear detection as follows:
- go to the section dedicated to settings;
- choose bluetooth;
- click on the “information” button;
- scroll down;
- turn off ear detection automatically.
Headphone charge
If less than 10% of the charge remains, the headphones in this situation often turn off and completely fail, they lose a lot in sound, the microphone also starts to work worse. You can permanently shorten battery life.
If the headphones behave this way, in practice they are useless. There will be very little pleasure from their use. In addition, if the headphones are not charged, it will no longer be enough to turn the sound on and off, much more action will be required.
That is why it is extremely important that the device has a full charge, in which case you will not have to face such difficulties. Of course, monitoring the charge level is also not so easy, but it’s easier than dealing with the consequences later.