Today, many people are happy owners of Samsung TVs with Smart TV function, which allows you to use your TV not only for its intended purpose, but also as a full-fledged multifunctional device with a connection to the Internet. However, quite often you can hear complaints about the difficulty of connecting your Samsung TV to WiFi network, while the connection to the Internet via cable works fine. There can be several reasons for this situation, from the floor and the router to the wrong settings on the TV. And in this article we will try to highlight all possible options, and tell you what you need to do to fix the problem yourself, without calling a specialist. And the most important thing here – the rules but to determine the cause.
Finding a reason
Unfortunately, nothing is perfect, and even such close to technological perfection devices as Samsung TVs of the latest models sometimes fail. This happens especially often when trying to connect the TV to a wireless Internet network. There are two common scenarios – the TV either does not see the available networks at all, or finds them, but refuses to connect to them. Or your Samsung finds a network and even connects to it, but all the applications behave as if there was no connection at all.
There can be several reasons for problems connecting your Samsung Smart TV to the WiFi network, but the most common one is the router itself. So, the first thing to check is the router itself. For starters, try connecting any other device to the same WiFi network and see if the internet works. If not, you should restart the router by disconnecting it from the network for 40-60 seconds. Then plug it back in, wait until all the lights are lit up, indicating that the modem is working properly, and try connecting your Samsung to WiFi again.
By the way, we can’t exclude the possibility of confusion: still, check if your Smart TV has a WiFi connection function at all, as some older Samsung models have Internet connection available only via cable.

Troubleshooting
So, let’s move on to the ways to fix this problem. First of all, we suggest you use the simplest and most obvious one: unplug your TV after waiting a full 60 seconds. More often than not, this elementary method works. While your TV is unplugged, hold down the Power Button on the TV itself, not the remote, for 30 seconds. This will allow your TV to completely reset any remaining power and restart. Plug the TV back in and check to see if it can connect to WiFi.
You can also try disconnecting the WiFi router for 30 to 60 seconds and turning it back on. Another easy way is to try to connect the TV to another Wi-Fi network. This is very important to check because this way we can find out what is the reason for the Samsung TV not connecting to Wi-Fi, or the Internet not working once connected. To do this, you can simply give out the Internet from your phone.
If these simple steps don’t work, move on to the next, more complicated methods. You’ll need these methods to solve the problems with the settings on your Samsung TV. For the most part, the settings on all models will be essentially the same, except for the order in which the data is entered.
Automatic WiFi connection settings on Samsung Smart TV
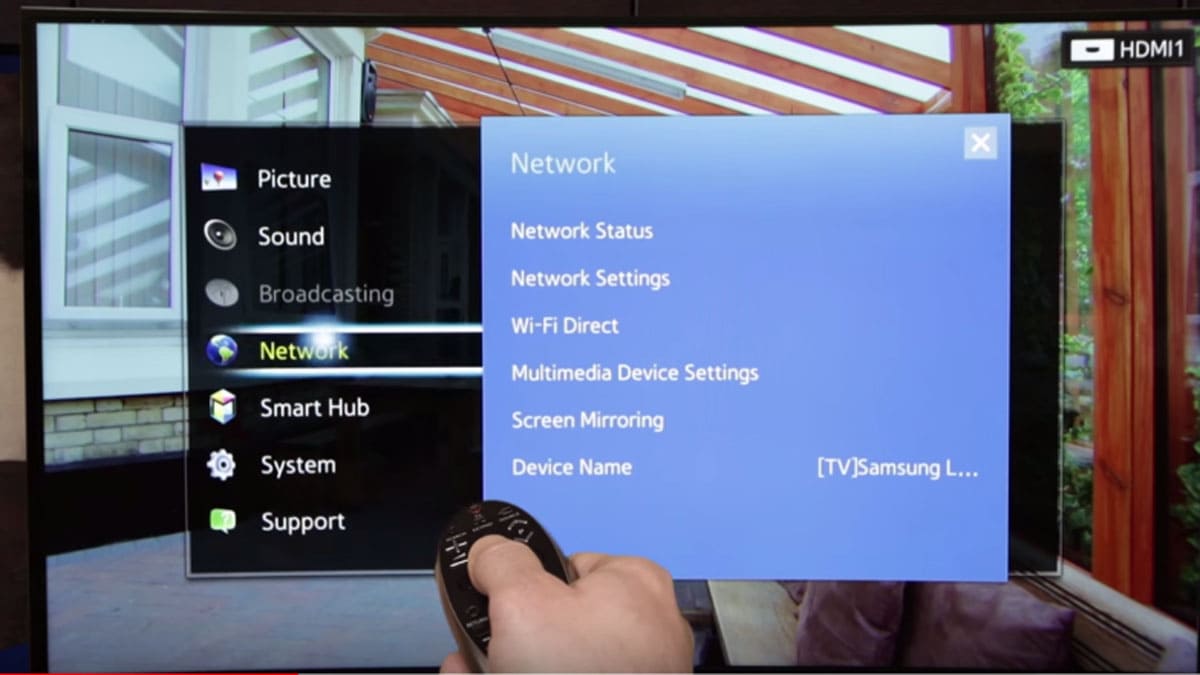
So, let’s proceed with the settings. It’s not as scary as it may seem, and establishing an automatic WiFi connection on your TV will only take several minutes, if you follow all the steps below. As we have already mentioned, the order of actions may vary from model to model, but the core is quite the same. To start, you should enter the Settings menu of your Samsung Smart TV by pressing the Menu button on the remote control, or on the TV panel itself.

Once you are in the main menu, go to “Network” on the left side of the settings menu. Next, find “Network Setup”, and select the option you want. In the context of today’s topic, we’ll select Wireless Connection. Your TV will then start searching for available WiFi networks to connect to, and will display all possible options on the screen. You select the network you want and, if necessary, enter the password. A little advice: to save your nerves and time, it is better to check the box “Show Password”, and make sure that the password is entered correctly.
If everything goes as planned, you will see a message on your TV screen saying that the device is successfully connected to the Internet, and a WiFi connection icon will appear at the top of the screen confirming the connection. Now you can try to go to any of the applications and check the reliability of the connection.
If it doesn’t work, you can try to fix the situation manually – but don’t worry, you won’t need a screwdriver.
Manual WiFi connection settings on Samsung Smart TV
So, the first two steps here will be similar to the automatic settings. Open the Settings Menu, go to Network, then to Network setup, and finally to Wireless Connection.
- Select the needed network from the list of available options on the screen of your TV
- Type in the passwo In the next window, enter the password for theWi-Fi network, and click the “Next” button to establish connection.
- If your tv receives the network parameters from the router, you will see a window with all the information. And here you should pay attention.
- Check whether the IP Address, Subnet Mask, Gateway and DNS Server fields have numbers written. If they do — you can simply press “Next” to complete the stage, but if there is no digits in front of any of the fields — you should click on the “IP Settings”, a type in the needed information.
Universal troubleshooting methods
Due to the different modifications of TV receivers, the problems that arise can be solved differently. Nevertheless, there are universal solutions.
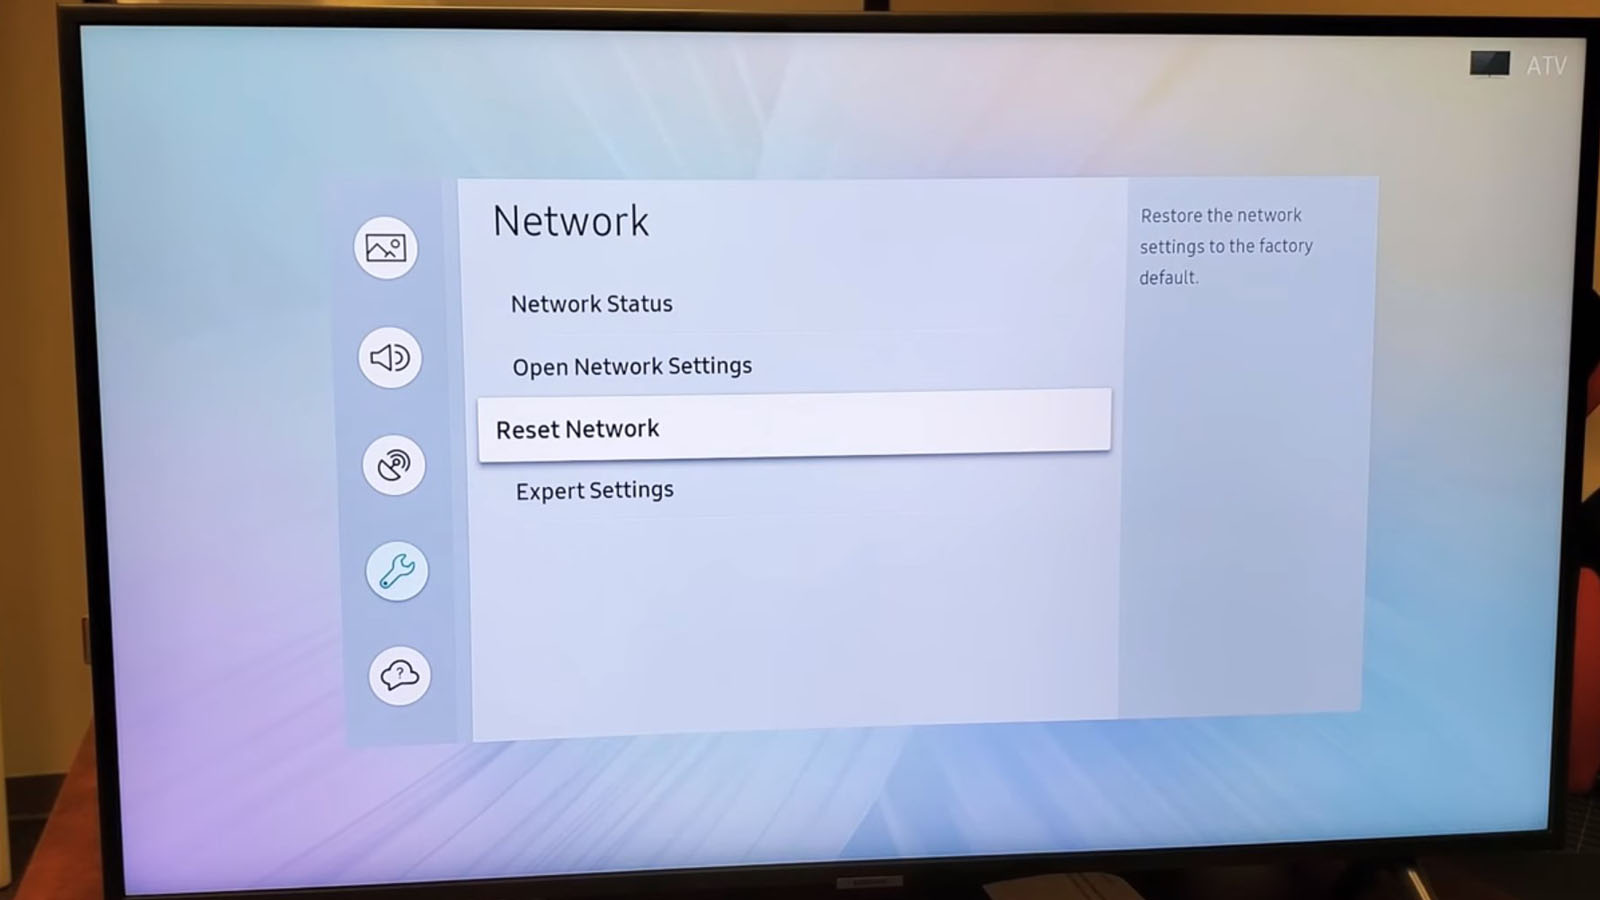
Network Reset on Samsung Smart TV
Unfortunately, this option is not present on all Samsung TVs, but only on newer ones. So, to reset all the system settings, you need to go back to the Network menu and then find the Reset Settings button. Once you press this button, all the settings of your Samsung Smart TV will be reset to factory settings. After resetting, you must turn off and on your TV again. On some models, this happens automatically.
Now go back to Network, Wireless Connection, find the network you want, enter the password, and wait for the connection.
Full data reset on Samsung Smart TV
Still no connection, and none of the above methods helped? Let’s try something more radical, such as a reset of full data in your device. To do that, you should go to the Support button in the menu if your Smart TV, and then — the Self-Disgnostics button. After, click on “Reset”. That’s it. If your Samsung TV requires a password for this operation, and you didn’t set any, simply try to type in “0000”.
In some models you can run the self-diagnostics of your TV via the SmartHub menu. If you can not find the button, check the internet, specifying the model of your TV, as some settings may vary.
No Internet Connection
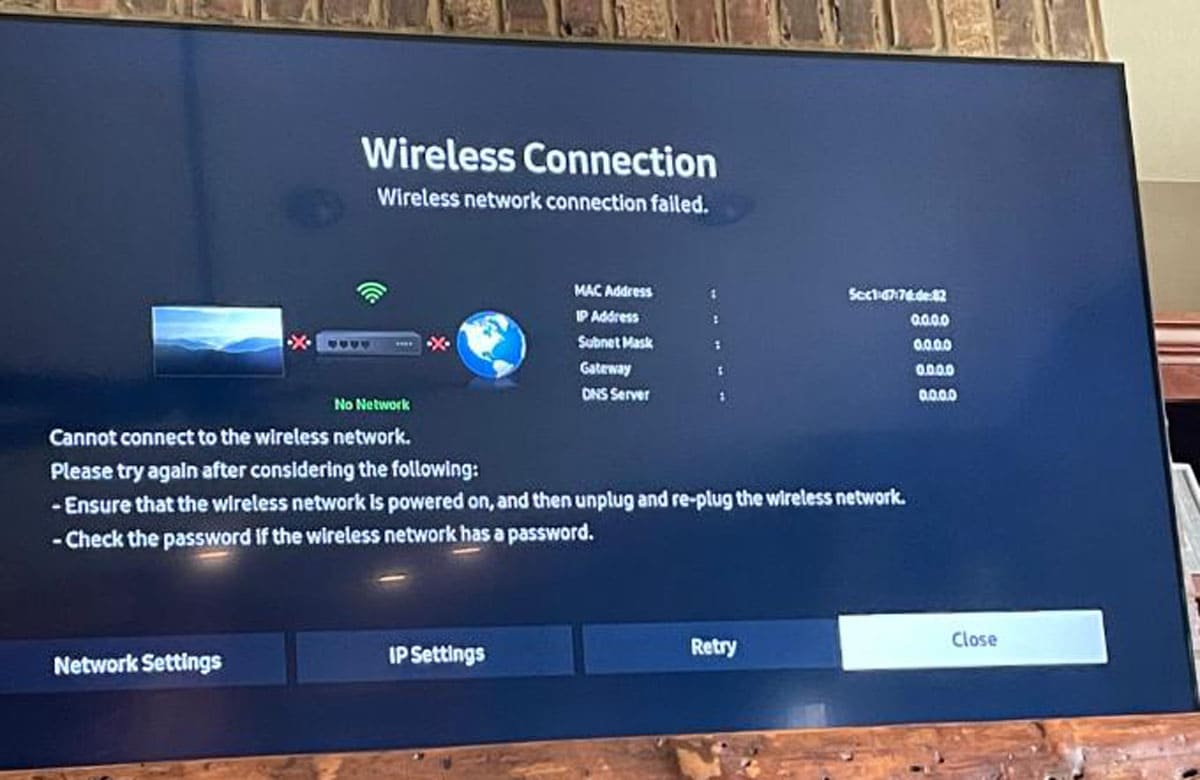
Sometimes your Samsung Smart TV device easily connects to a network, and sometimes if just doesn’t see it. But there is one more possible scenario: it connects, but without access to the internet. Such situations are usually followed by the system messages in the Network Status Menu: “Failed to connect to the wireless network” or “Failed to connect to the Internet”.
Of course, the first thing to do is to check if the internet works through the router on the other devices. If it works, disconnect the router from the television and turn off you TV for 15-20 minutes. Reboot the wifi router, Connect it back to the TV and switch it on. Now try to reconnect to the network.
If the problem is not solved, you must try prescribing a static DNS server in the network settings of the Samsung TV. In order to do this, you should go to the Settings Menu again, and choose the Network Status button. Then click on the IP Settings, -> DNS Settings and choose the “Enter Manually” option. In the window, enter the address 8.8.8.8 or 8.8.4.4, which is the public DNS, and press “Ok”.
Now to check if it worked out, you should click on the “Repeat” button and wait for your device to set a connection. If it’s ok — congratulations! But if it’s not, don’t give up yet, and try to reboot your TV again, by unplugging it for 10-15 minutes.
Rare problems when connecting the TV to Wi-Fi
In most cases, problems with the connection are solved by setting the appropriate settings, but sometimes there are private situations that also need to be solved:
- Samsung TV automatically connects to someone else’s network and does not allow you to connect to the needed one. If it’s your case — the thing you should do is reseting your home network. To do this, go to the Network Settings menu, Reset the Local Network, and update the connections search. Choose the needed network and reconnect.
- The error is only displayed in individual applications. If the online TV works smoothly, but the system resets the connection when you try to open, for example, YouTube, or Netflix, you will need to reset the TV settings. It can also be done in the Settings Menu.
- The TV connects to the network and immediately resets the connection. Apparently, the problem lies in the signal security settings. It is necessary to open the router settings and set the security type WPA2-PSK.
- Unstable connection, the Internet speed is jumping. In this case, the problem can be caused either by the router or the ISP. If sags are observed on all devices, you should contact your ISP.