
Maytag has established itself as a reliable and conscientious manufacturer of quality home appliances. At the same time, even their products can sometimes fail. Nobody is immune from this.
The most common breakdown that owners of Maytag equipment face is a dryer malfunction. It’s about no heat. In this article, we will take a closer look at the most likely causes of this kind of breakdown, and talk about ways to eliminate them.
Dryer Thermal Shutdown Malfunction
The first place in the list of malfunctions leading to a lack of heating is occupied by a breakdown of the thermal switch. At the same time, the owner of the dryer will be able to cope with this problem on his own. It is important to have a minimum of tools and at least a little experience in repairing any household appliances.
It is worth starting repair work with the purchase of a thermal cut-off kit designed for a dryer. The kit contains the optimal set of parts for repair work. It also has a new thermal switch and thermostat. We recommend changing these two important elements at the same time.
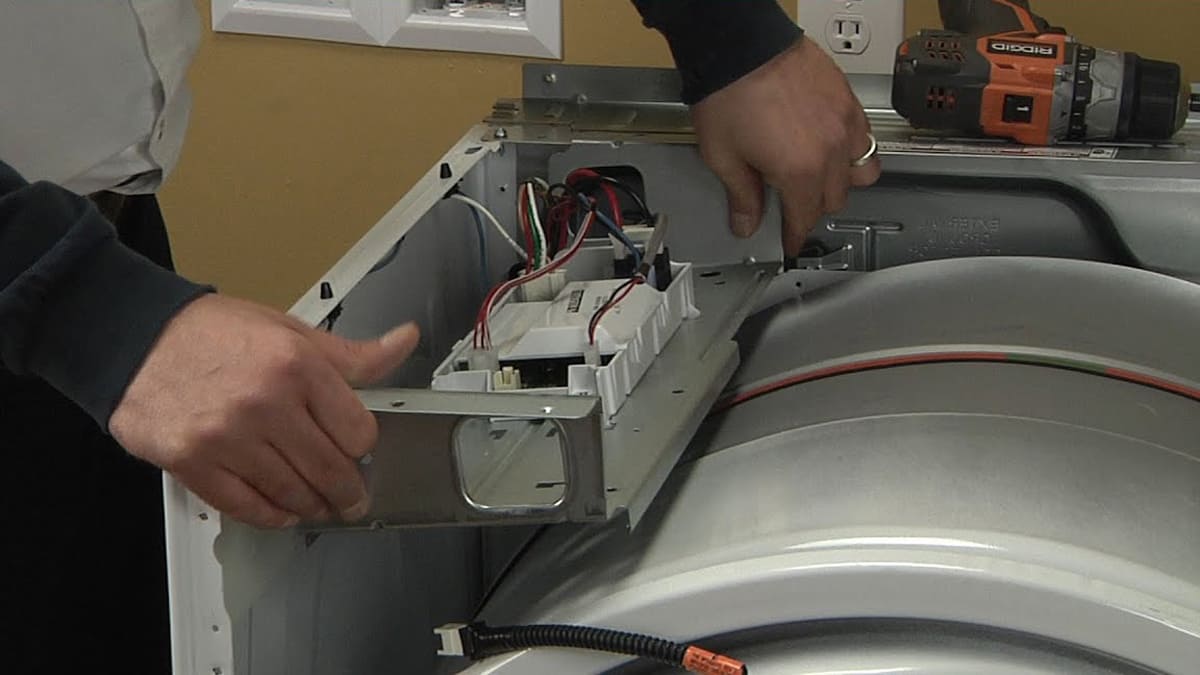
For tools, you will need a flathead screwdriver, as well as a ¼ socket wrench. Any repair work must begin with the de-energization of a faulty electrical appliance. Next, move the dryer away from the wall, thereby freeing access to the back cover. Remove the outlet hose and then remove the screws from the back cover. At the top of the shutter you will see a thermal switch. The thermostat can be found at the bottom.
In order to disconnect a pair of wires going to a broken thermal switch, you need to use a flat screwdriver. Next, unscrew the bolt and dismantle the faulty part. After all the preparatory work has been completed, you can proceed to install a new cut-off. Replace the thermostat in the same way. After that, replace the back cover and test the repaired dryer.
Dryer thermal fuse failed
The manufacturer has made sure that the dryer can be used as safely as possible. To do this, he provided for the presence of several functions that help to avoid the occurrence of fire hazards.

If the safety devices trip, the dryer can still run but no hot air comes out. Most often, the problem lies in the thermal fuse of the dehumidifier. This element is responsible for turning off the heater circuit if the system is threatened with overheating.
So, if the drying cycle is over, but the laundry in the drum remains wet, then it is worth checking the operation of the thermal fuse. This element could fail or burn out. In this case, repair work will be reduced to changing the faulty part. A new element can be ordered directly from the manufacturer.
As in the previous version, you will need a ¼ wrench and a flat screwdriver to perform the repair. If you have a replacement part, you can start working. Move the dryer away from the wall, making sure the power cord is unplugged. Next, disconnect the exhaust hose.
Using a wrench, unscrew all the bolts holding the back cover of the dryer, behind it is a defective thermal fuse. The element is located in the lower segment of the dryer fan impeller. It has two wires that need to be disconnected. This can be done with a flat screwdriver. Next, you need to remove the screw on which the thermal fuse is screwed. Dismantle the broken part, and install a new one in its place. Then, in reverse order, assemble the machine to its original position.
Remember to connect the wires to the terminals, it doesn’t matter which wire goes where. Install the back cover and put the machine in its usual place. After that, you can start the drying cycle and check the correct operation of the equipment.
Heating element not working
The list of the most likely causes that lead to the lack of hot air in the dryer includes a malfunctioning heating element. It can break due to wear or burn out.
To confirm or refute this version, you will need a multimeter. With the help of the device, it is possible to detect a malfunction in the terminals or a lack of continuity in the coils. In the event of a breakdown, you can contact the manufacturer with a request for a new part. The repair process should not cause any problems. From the equipment you need only a couple of tools and skills to work with them.
As in previous cases, turn off the power to the equipment and remove the exhaust hose. Next, move the device away from the wall so that you can work comfortably and have access to the inside of the dryer. Remove the protective cover located on the back side.
Look for the heater block at the bottom of the dryer. Use a flathead screwdriver to remove the wires leading to the unit. Then unscrew the bolts on which it is attached.

Don’t forget the thermostat. It must be removed from the old heater in order to install on a new one. The part is screwed on with just one screw, so it will not be difficult to dismantle it.
Next, reconnect the wires to the new part. Replace the unscrewed covers and firmly fix the retaining bolts. Install the outlet hose back into the vent hole. Now you can test the repaired equipment. The dryer should heat up again.
Broken Hi-Limit thermostat
The list of possible breakdowns ends with a malfunction of the Hi-Limit thermostat. If this thermostat stops working, the heating element will simply not start. You can check the condition of the part with a multimeter. Based on the indicators of the device, a decision is already being made to replace the broken element. A new part can be ordered from the manufacturer.
After buying a thermostat, you can start repairing the dryer. For repairs, you must have a ¼ inch wrench in your arsenal, as well as a screwdriver with a flat working edge.
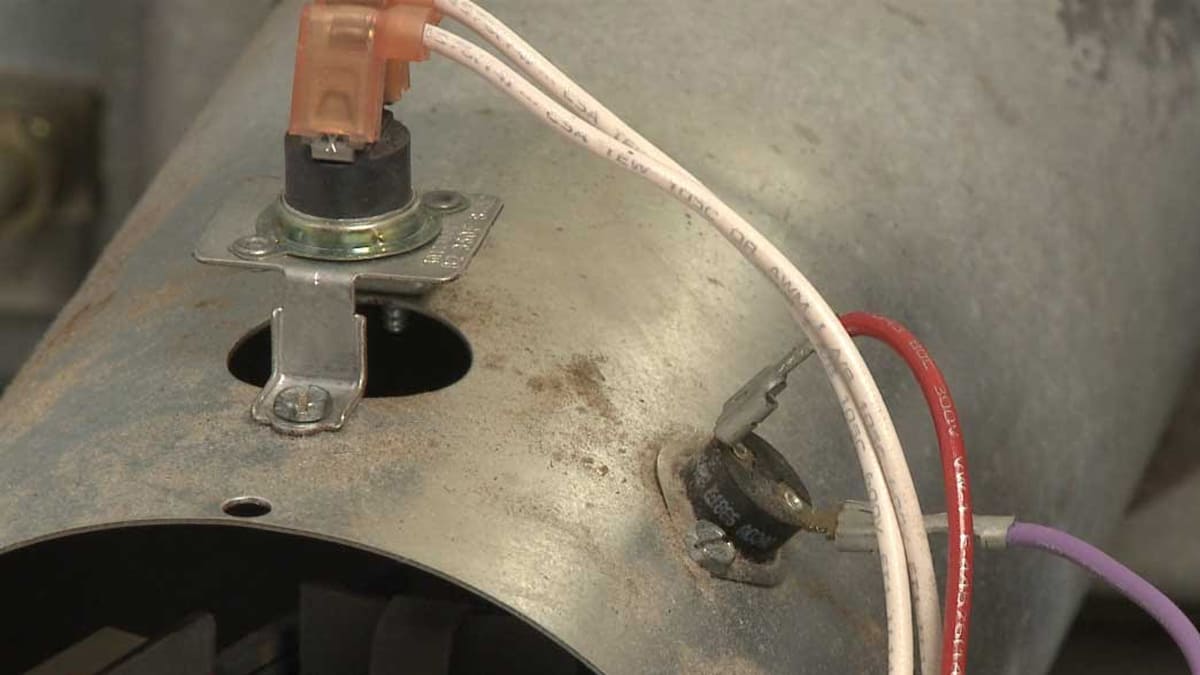
Shut off the machine beforehand and remove the outlet hose. Next, move the equipment so that free access to the rear panel opens. A faulty Hi-Limit thermostat should be looked for on the heating element block, which is located in the lower segment of the dryer. The next step is to disconnect the wires going to the thermostat. They can be removed with a flat head screwdriver. Next, use the wrench to unscrew the screw holding the thermostat.
Replace the old failed element with a new part. Fasten it to the desired location with the retaining fixing screw. After that, bring the previously disconnected wires to it. Next, install the cover and fix it firmly with the appropriate screws. Strictly follow the sequence of steps in order for the new part to work properly.
After the broken part has been replaced and the machine is assembled, you can start testing it. If the problem was a broken thermostat, then after performing the steps described above, the dryer will again begin to perform its usual functions correctly.